Wednesday 27 June 2012

What's on Your Workdesk Wednesday # 160

Every Wednesday blogland goes a little crazy and we all start nosing around each other's desks to see what's what. Well what's what is Wednesday comes round very quickly!! If you want to join in with this weeks WOYWW then hop on over to see its creator Julia Dunnit at her blog Stamping Ground - she's always good for a giggle!!


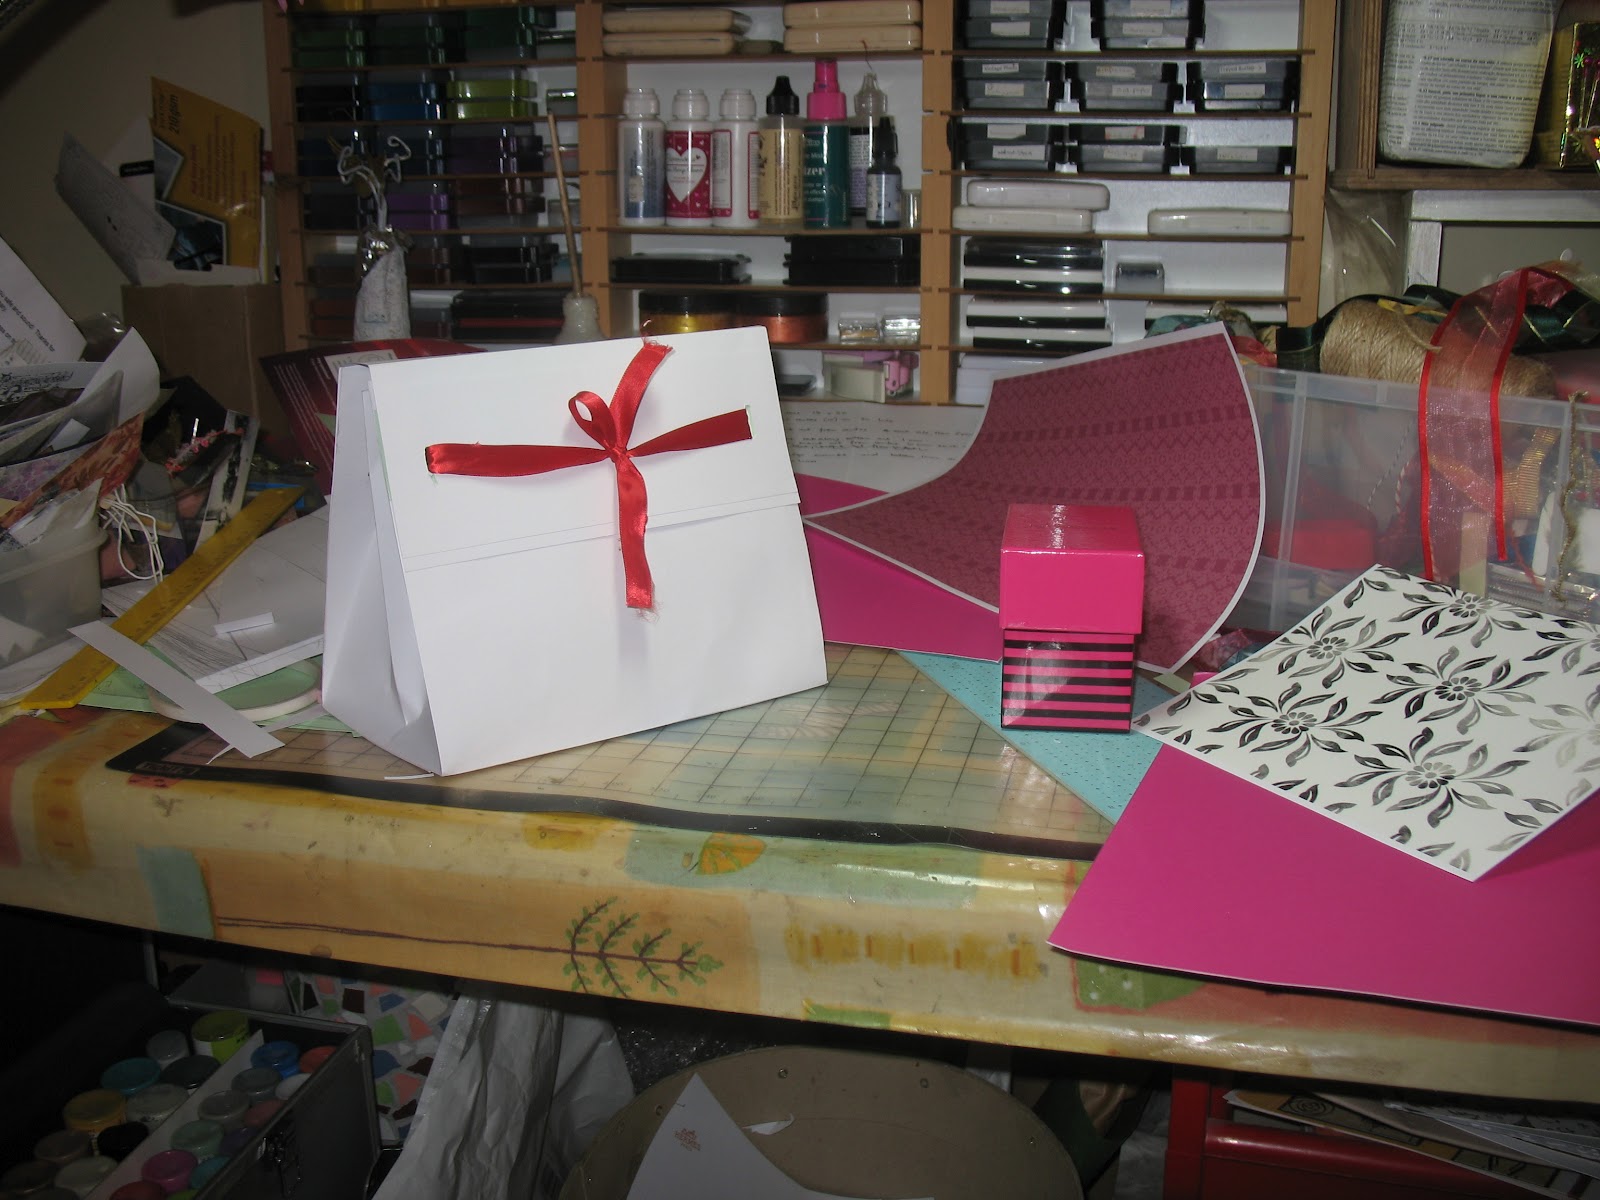
So here's mine, relatively tidy (!) with a couple of WIPs - and I really haven't staged this. No stamps or inkpads - I think that when I'm in the mood for stamping my tidy gene runs out the window!! I love this little canvas which I started a while ago, I think it's finished apart from some words and I'm dithering between 'Everyone has their own journey to make' and 'Everybody has their own road to travel'. Big difference huh? But I've already been dithering for over 24 hours. (Must learn to commit....).

This is a bit of a sneaky preview as I think this will be  next month's art draw/giveaway, we haven't had a canvas for a while. And while I'm on the subject the current draw has very few entries (see top right if you want to remedy that) and closes on Saturday.

I must also give a bit of an apology to those who left comments last week - I have to confess I didn't get to visit you all. I was working Wednesday till 8 and had a little family emergency when I got in which continued on to the next day, had to go out straight after work Friday, caught up a bit Saturday but did my handbag tutorial instead of visiting, burst pipe Saturday night, had to put up a fence panel Sunday and then the sun came out so we sat in the garden with a bottle of wine (well it might have been two) until it was time for the footie. Hopefully this week will be less traumatic and it is my last late night working on a Wednesday (yay!!) tomorrow so hopefully I won't have to make excuses in the future!! Happy WOYWW!!

Saturday 23 June 2012

Handbag style Gift Bag 'Tutorial'

Well I'm not usually a tutorial person but as several people suggested it here is an explanation of my thought processes. What I will say is there is certainly more than one way to do each of these steps and my method may at times seem to have too many steps. But rather than twist myself in knots trying to think of the best way to explain what I did I am just showing it as I did it. Hope that makes sense!! I warn you that the photos are likely to be awful.

First of all my inspiration was from this bag which I found here when looking for templates. I printed out the template out on A4, but of course it was way too small for what I needed. Not having access to enlarging facilities I decided I would just use it as a guide.

For this project I used a light to medium weight craft card (probably about 160/180 gsm). A heavier card might not sit so well for the sides. I used 5 sheets of A4 card to make the basic shape. (Although by adjusting the size of the top/flap piece you could probably get it down to 4). I cut each piece (front/back/sides x 2/top) as a separate item and added tabs where necessary to join them together. Be warned, I don't like measuring!!

- Front and Back
My bag had to fit some gift boxes and I needed a base of approximately 18 x 12 cms to accommmodate them.
Take two pieces of A4 card and cut the long side down to 29cms.
Take one of these and score at 12 cms on the long side.
Score the second piece at 1cm and 12 cm on the long side. Cut off the 1cm.
This gave me the front and back and base section.
By overlapping the smaller section of each card and gluing them together I reinforced the bottom.
Having one of the 'bottom' pieces slightly smaller than the other meant the join was underneath rather than exactly on the edge.


- Sides
The two sides seemed fairly complex in the original template. However after trying to work out the relational measurements (and failing) I did the following.

Cut two pieces of  card, 18cm x 20cm.
On each piece do the following-
Score and fold at centre (10 cm) on the long side
On the 'top' make a guide mark at 1, 6, 14 and 19 cms
Score along the bottom edge at 1cm. This will create your 'tab' to fix the sides to the base.
On this 1 cm line, make a guide mark at 4 and 16 cms
Create score lines from the marks at 1 and 6 along the top to 4 on the 1cm line and from 14 and 19 along the top to 16 on the 1 cm line.
On the outside edges create a tab so you can join all the sides together - oh, just look at the picture!!

- Ribbon Slots
After playing around with different measurements I decided that the sides of the bag would have probably worked without all this complex fold calculating just by doing a stright rectangle with a fold!! But I liked the ribbon slots and the way the bag in the original design opens wider at the top so thought I would try and replicate that as far as possible. However the hardest part was deciding where to cut the slots. Eventually I opted for placing them all 2cms down from the top edge at roughly equal/central intervals. The size of your actual slot will depend on the ribbon you intend to use. Cut them with a craft knife.
(This is not exactly a perfect instruction and they will NOT line up exactly when the whole thing is put together but it seemed to work well enough for me. After all, it's just a gift bag!!).
You will also need slots on the back piece, the front piece and your flap (see below) if you want to tie your gift box like mine,


- Top and Flap
The original sample I looked at appeared to have the flap just tucking behind a paper ribbon - I wanted the purse to be able to be held by the handle and couldn't see how this would work (surely the bag would pull open?) so my design also has ribbon holes on the flap to thread the ribbon through and tie at the front thus holding the whole thing together. Alternatively velcro or another type of fastening might work.
You can make this as big as you like, depending on how fancy you want to make the front and back of your purse. Basically you need to make a 'U' shaped piece of card with two folds and three sections. One 'section' will attach to the back, the central piece will be the top where the handle is fixed (make that about 3cms deep) and the third side will be your front flap. If you are threading all the way round like I did you will need two ribbon slots on the back and front at the same height as the ones on the side. You may want to leave the final positioning of the slots on the front flap until you have put the bag together to make sure you line them up properly for a neat finish.

- Decorating and construction
I covered the front, back and top in decorative paper which strengthened it all. I suggest you do this before you put the whole thing together. I left the sides white which fitted with my colour scheme. Alternatively I would suggest making the sides with your patterned paper (if not too thin) as a double layer might make the folds in the sides troublesome. (Note: after you have attached them you may have to just trim the top corners of the sides ever so slightly).
I made a handle with a strip of paper and card and added it but you could use ribbon, wire and beads - whatever you wish. Once I was happy with the decoration I put the whole thing together.

Finally I embellished the bag with diecuts, flowers and a matching tag and added a length of co-ordinating ribbon. Closing Tip: When my  bag was all put together I found I had a bit of 'play' in the closure because my ribbon was quite a bit narrower than the slots I had cut - so choose your ribbon first and size your ribbon slots accordingly.

I can't help feeling this was all a bit longwinded but it may be helpful if you want to make a larger bag without using enormous pieces of card. It really is easier than it sounds. The finished project is approx 17 cms high, 12 cms deep and 21 cms wide (ie the width of a standard piece of A4). Enjoy!


Wednesday 20 June 2012

It's Wednesday AGAIN!! - WOYWW # 159

The weeks just fly by.... but at least getting together every Wednesday for a wander around blogland gives a purpose to the swiftly passing days..... so pop on over to Stamping Ground, say 'hi' to our leader, Julia Dunnit and join in. Go on, you know you want to!

I am gift 'box' making for a friend. I sometimes make up Kay and Co purse boxes from a pack I have, they are very cute. A friend who likes them asked me to make something similar for a special present. But it needs to be big enough to contain several smaller gift boxes. Groan. A challenge.

Found some lovely purse templates at Mel's Stamps - do check it out, a stunning resource for all sorts of stuff. But they are mostly designed to print out on A4, so waaaaay too small. So I sort of worked out my own based  loosely on one of them.

This is my prototype which I am quite proud of.  (I won't show the discarded ones on the floor.)With a selection of possible papers (everybody wants pink this week, I don't HAVE pink!!)....... I'm thinking black and white with a hot pink ribbon and flower(s). Hopefully the fully decorated one will be ready by next Wednesday. Till then you'll have to use your imagination.

Anyhow, Happy WOYWW everyone!!

Cindy

Tuesday 19 June 2012

Try It On Tuesday - Anything Goes

Wow the response to the last challenge was so amazing that we are making our next challenge  'anything goes' once again. Which is great because it means I can share this vintage 'printer frame' card, inspired by a project in Craft Stamper magazine.

In fact, it is not a real printer's tray, I made it up myself with mountboard and it was really easy to do.

In the end I wasn't quite sure what the theme was, but it turned out reasonably girly so  it has gone off as a birthday present. As usual my photography skills are not up to much - I'm sure it looks better IRL.


So why not join in with us this week at Try it on Tuesday, you have two weeks to link up to any kind of project - simples!! Just remember, we are being quite strict about the number of links you can have for your project if you want to be considered for Top 5 or our Monthly Prize Draw. Can't wait to see what you get up to this fortnight!!

Sunday 17 June 2012

Tags of 2012 - June

Well it's halfway through June and it occurs to me it might be time to mosey over to the 12 tags of 2012 and see what Mr Holtz has to  inspire us this month. Here is Tim's tag:


First I tried out the marbled/mottled backgrounds using the materials at my disposal. Unbelievably, I do not yet own the picket fence distress stain so I try and improvise with a chalk acrylic. Quite pleased with the result but I'm a little pinker than I should be perhaps. That'll be the Fired Brick I chucked in to liven things up!!

I'm going to have to make my own flower embellishment. Grudgingly looked in my material box (don't go there..) to see if I had a piece of organza I could use. Nada. Then I recalled I had one of those little drawstring bags floating around the craft room. So I chopped it up and stained it along with some vintage ribbon and (just in case) some flowers I'd found on an old hula hula costume ( I kid you not). It did occur to me that this might have been a bit premature as I am not yet sure what colour this tag is going to turn out ......

Chose a different TH stamp, but one that had the 'photography' words on to randomly stamp the background. These tags are definitely going to  be pink!! Did a bit of 'stressing' (as my dear old mum calls it) round the edges with Black Soot and Vintage Photo.

Watched the Vid with delight as I have tried this technique before and actually posess some of the nibs (though not the holder). Tim's photo was so cute I decided to go with it but with no photopaper to be found had to be content with a decent graphic paper. The tinting went well I think, although it was hard to spread the ink because this was not a coated paper. I wet the nib with water to help me move it around.


Nearly there, I had to go my own way with my embellishments - I even got out a needle and thread to that organza... not entirely successful LOL, in fact not happy with the flowers at all -  a bit of alcohol inking, distressing, embossing and generally mucking about with bits and bobs in y stash. Just don't have the variety of things to load them up as much as Tim does but here we are.
Had to re-colour the ribbons......


I'm still not sure about the pink though!!


Friday 15 June 2012

Tres Chique....

I was restless when I got in from work today, another late finish for me. After faffing around for a while I realised that what I wanted to do was play with my new stamps the 'Antique Dress Forms' set from Creative Expressions. After doing Sir Tim's May tag I was feeling deprived that I didn't have any dress form stamps (apart from my steampunky Kanban one.....oops) and I've liked these ones for a while - who am I kidding, any excuse to go shopping!!

So I whipped up a quick tag which I'm quite pleased with even though I didn't stamp the forms quite where I originally intended. Oh well I can always try it again!! I must say these stamps came out beautifully right from the word go. I made a quick scrunchy flower because it was already getting quite late, and finished it off with a couple of die cuts and some ribbon. I spent half an hour looking for a suitable piece until I caved and just coloured a bit of vintage seam binding to match. I really don't know why I have so much ribbon, I never seem to find a use for any of it and its an absolute nightmare to store. Added a little bit of clear rock candy for some texture (probably still wet in the photo LOL).

I added a little button to the centre of my flower threaded with baker's twine (which I am still in love with). Little tip - after getting rather frustrated trying to get the twine through the holes in my button I hit on the idea of binding the end with sellotape - a bit like the end of a shoelace. Worked like a dream. (I may of course be the only person on the planet who didn't know that already).

So because this tag has a button I am able to enter it in to the current 'Out of a Hat Creations' Challenge. So typical of me, I have a million things I should be doing and make something for the challenge with the furthest away deadline!!

Anyhow that's it for now, feel better now I've actually made something but need to go and get some zzzs, work again tomorrow.

Cindy x

Wednesday 13 June 2012

WOYWW # 158

It's here. It's Wednesday. Are you ready?
So what exactly is on YOUR workdesk this Wednesday?

(Don't you love how my  ribbons are escaping from their shelf?)
I haven't got a lot of craft to show, what I have been doing is still a bit secret squirrel so you will have to wait. In the interim I have been having a bit of a tidy. Here is one of my new ATC displays, including some of the ATCs I got for the WOYWW third anniversary swap - how cool was that? Actually not so much a new display as a replacement for the extremely loopy piece of string I used to have. Now they are hanging from an only slightly loopy rod made from kebab sticks bound together with double sided tape. Oh well, it whiled away an hour.


Here's my other other ATC display. You've seen this before, but I've swapped in some new ones. (But I also kept some favourites!)


and the piece de resistance........

I only posess four of the distress 'handles' but nearly all of the inks and it's been driving me crazy trying to find a way to keep all the different colour pads in some kind of order. I saw something similar on Neil Walker's blog a while ago so promptly ordered myself some velcro dots and when I had a minute did this and my little pads are all now grouped in colour families (well most of them are new ones!!) and can be easily swapped over and stored. I also decided to keep one handle for Black Soot and one for Antique Linen as I use these the most. I have room in my little box for two more which I'll pick up when I see them and that should do me. You just can't believe how much difference this simple thing has made to me.
Oh well little things......

Anyhow if you don't know what WOYWW is then get yourself over to Julia Dunnit's 'Stamping Ground' and join in this weekly bloghopping phenomenon. Visit two or two hundred, it's all a bit of friendly fun. Leave me a comment and I will definitely pop by and see you but it may be late as I am working today. I freely admit I have never yet got even near getting round the whole list (kudos to  those that do!!) but I do my best each week.

and now I have to go , hey ho hey ho it's off to work I go.....

Happy WOYWW, Cindy x

Tuesday 12 June 2012

Get your glitter on!!

A quick card for a new challenge site J & C Creations Challenge Blog where the first theme is 'All that Glitters'. I used an image printed on acetate and then glittered behind using a clear drying glue. Had forgotten how long it can take to dry (especially when it's so flippin' cold!!). So just managed to get it together this morning in time. All the other bits were scraps, which always makes me happy!! Sorry about the glare in the photo, this was the best of about 10 shots.


There are prizes so this could be a good one to watch!!

Cindy x

Sunday 10 June 2012

June Art Draw is here

Oh dear, I really don't know where this month is going. I hope I am enjoying myself, but it all seems to be speeding by in a rush and there is a distinct lack of blogging and crafting activity this month!!


Anyhow, on to the business at hand. Here is this month's giveaway.

Not quite sure how to describe it - screen card?  I was trying out a project from Craft Stamper magazine. It'll probably make more sense if I show it open.


It has a butterfly theme. Anyhow, if you'd like to be in my Art Draw this month  then just leave a comment on this post before 9.00 pm on Saturday 30th June.


International players welcome. Please feel free to link from your own blogs (two entries in the draw for those who do). Thanks for joining in.

Cindyx

What's On Your Workdesk Wednesday? #771

  Morning deskers, welcome to our weekly Wednesday Blog Hop - WOYWW. Here's the link to the one responsible, the lovely   Julia at Stamp...