Friday 31 December 2010

Last post of 2011..... oops that should read 2010...


well, think I peaked a bit early with all those Tim Holtz tags, haven't been on here in over a fortnight!! Seriously, after being very organised initially with loads of cards ready for Christmas, at the end of November I was asked to take my Christmas cards to a lunch meeting - they nearly cleared me out which left me with a huge panic to get everything done...... and then snow came and half of it either didn't get posted or probably didn't arrive in time.


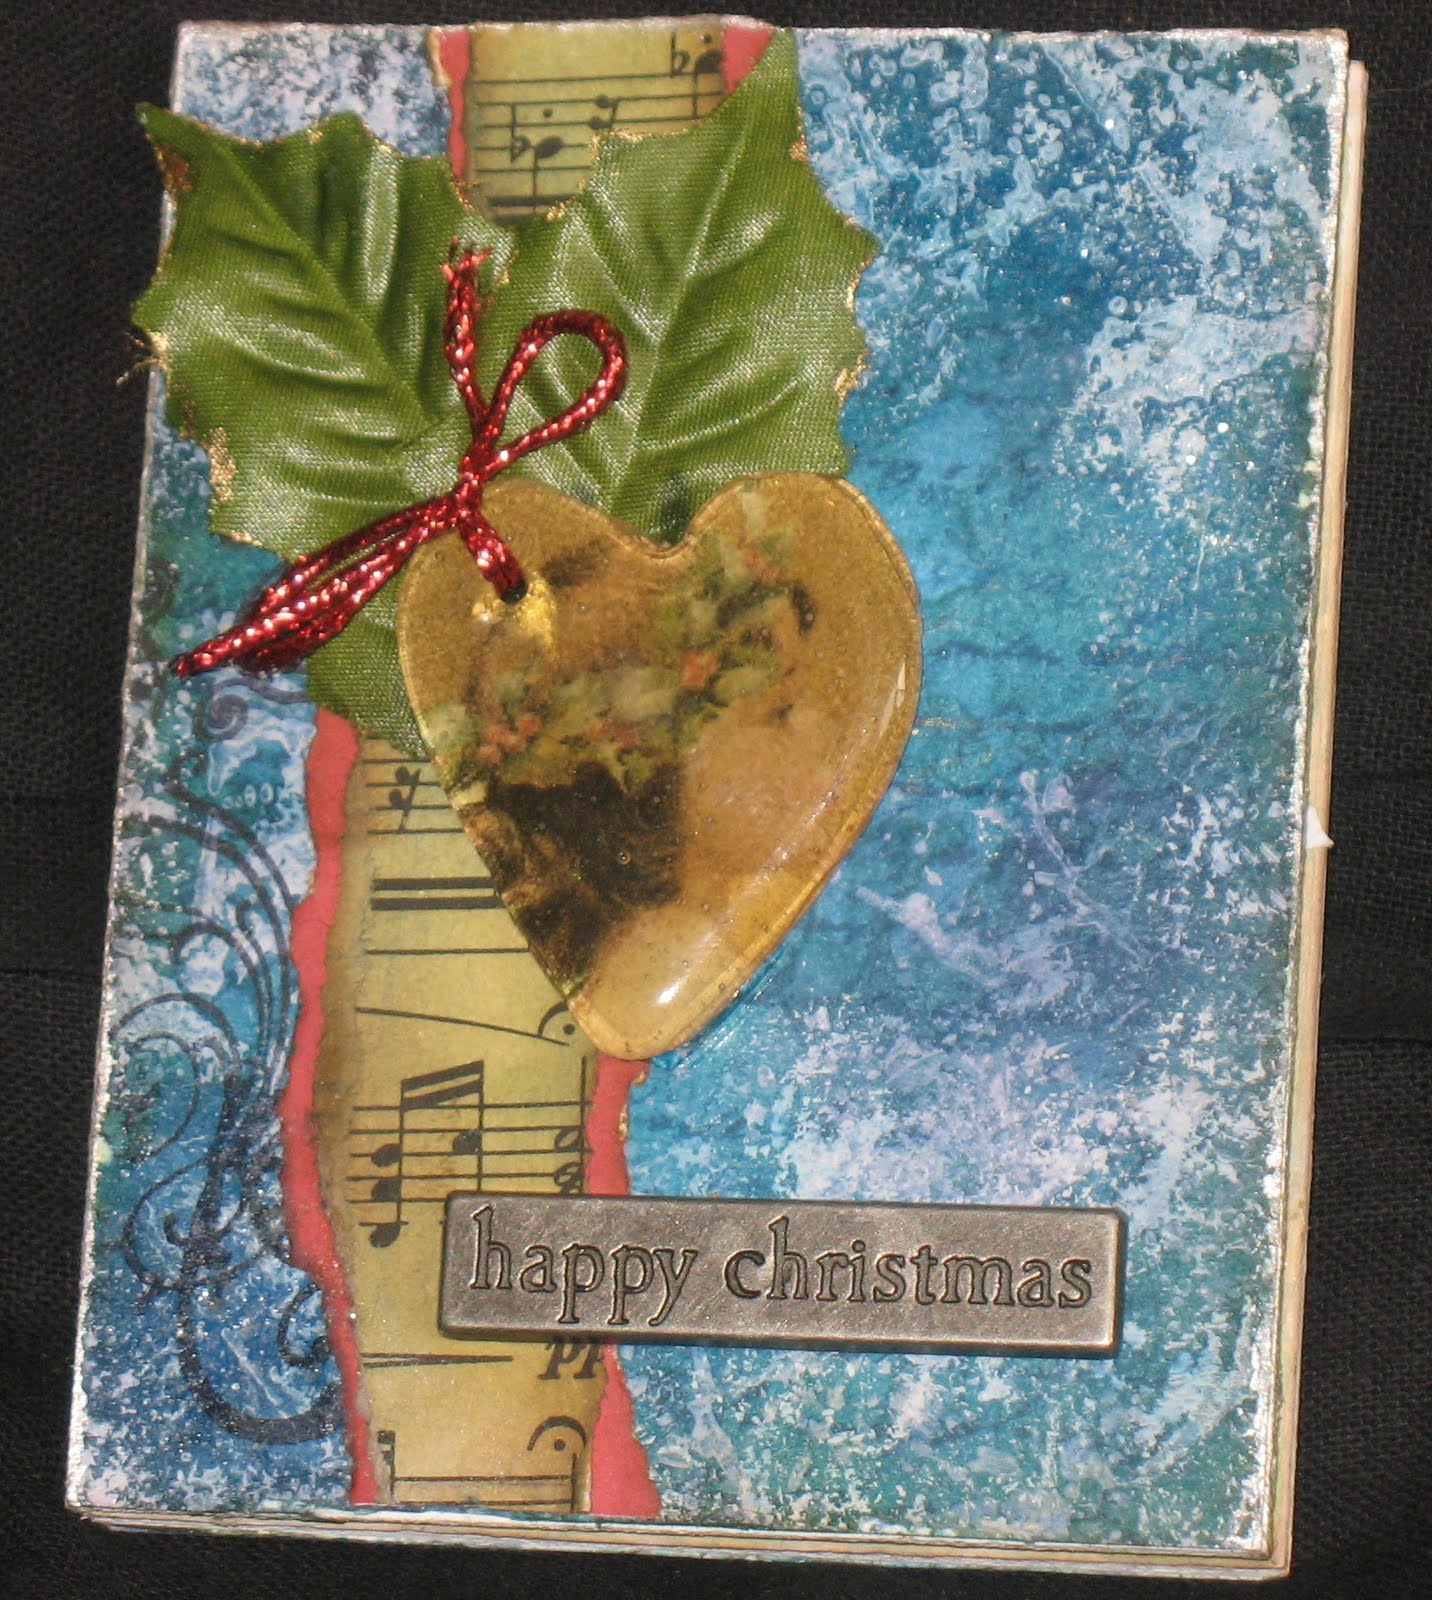
A bit of a production line had to be in initiated. Here are some of the designs I did. The 'angel' stamp is a Sugar Nellie stamp designed by Diane Duda. It is also a fundraiser stamp with all proceeds going to support UK breast cancer charity so if you like it they are still available to purchase. The girly 'Santa' is from an Urban belle collection.


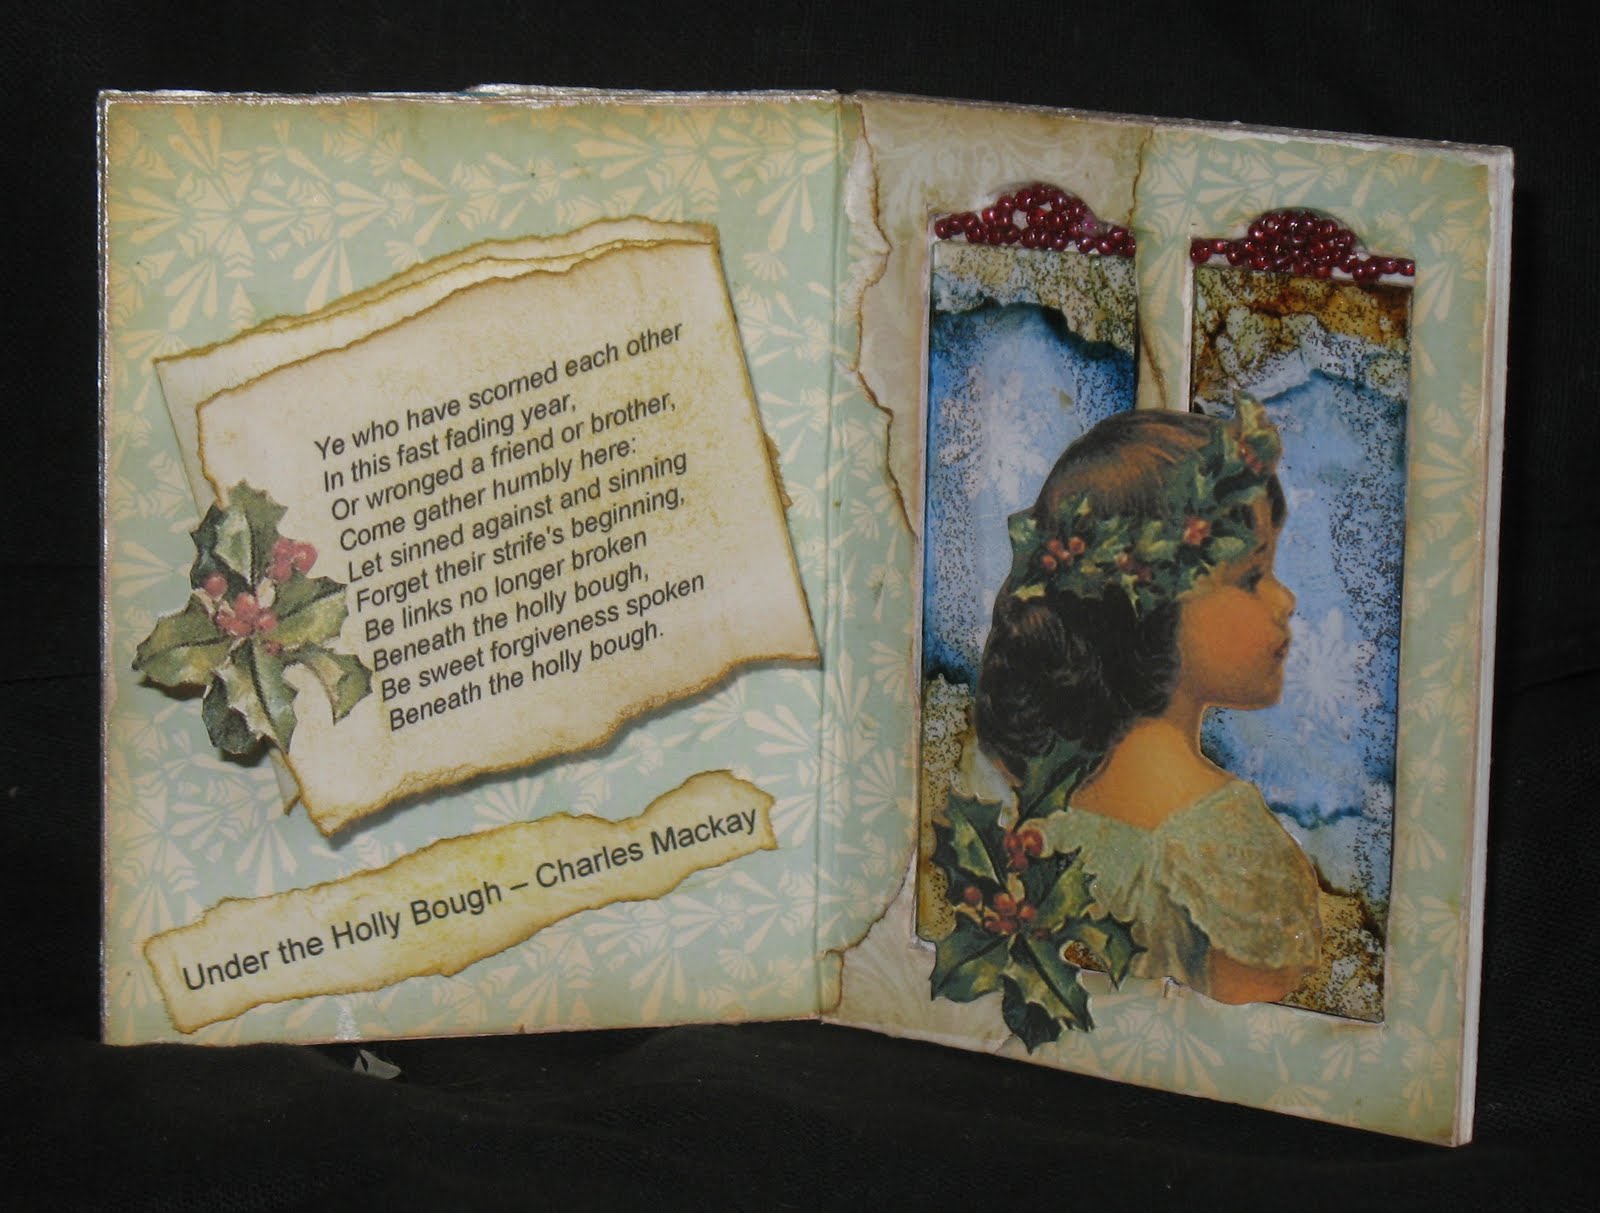
But my favourite card for this Christmas was this trifold/swing card(???If anyone knows the correct name please put me out of my misery!! I can't find the magazine) inspired by a project in craft stamper magazing (Dec 2010). I haven't made one of these before but was surpised at how easy they were to do and they are wonderfully dimensional when opened out. My second attempt was for my mum and came out even better (what a big head I am) but I forget to photograph it - doh!


Well that's about it for this year, but I am just about to go and join in with the Stamp Man's Blog hop and Challenge (There are PRIZES so go join in). Part of the Challenge is to showcase the piece of work you are most please with in 2010. So I have had a look through and chosen my favourite. If you would like to join in for my personal little challenge, have a look back through my posts and let me know your choice for 2010.... I'll be uploading mine on Monday, and there'll be a little prize for anyone agrees with mine.

It only remains for me to thank my blog readers for your support this past year, I enjoy reading every single comment and it really means a lot to me that people take the time to return on a regular basis. So, here's wishing you a very Happy New Year, and a healthy, happy and prosperous 2011.

Hugs, Cindy xxx

Tuesday 14 December 2010

Tagtastic, 12 tags done and dusted...

Here are the last four tags, and finally a challenge I have managed to complete pretty much on time (some of us do have to work you know!!)

Tag 9 - Paper Rosette


Who knew that this would be so easy to do? I don't have the die, but I took a piece of 12 x 12 paper and ran it through a punch to give a scalloped edge and then used the scallops as a guide to fold it. The tinsel not so easy to stick on - BIG mistake not getting out the glue gun!! And as for the brads - I don't have a texture hammer but a big bang with my ordinary one seemed to do the trick!!


Tag 10 - Packaging


I had to go off at a slightly different tangent as I didn't have any snow men shapes but the basic principle of embossing acetate packaging worked really well. The 'bauble' is a chipboard shape and I stamped flourishes on it in gold but they didn't come out that well - however, I think it made it look suitable 'old'.


Tag 11 - Foam stamps


Well I groaned again. Don't have these dies, I have mainly nesties... but hey, what about the poinsetta die again? So out it came again and I made a foam stamp with it. Worked really well I thought and really easy to do (of course I just improvised with pritt stick to attach it to an acrylic block but it still worked. I guess it is better to do it properly if you think you will use it a lot.) For the rest I just used a few embellies I had laying around and put bells on because the text is about Christmas bells.


Tag 12 - Movers and Shapers........ Say again??


Had never come across these before, I can kind of see the appeal but don't think they are anything I would ever buy. I did try to make a bauble using nesties and that die again to cut a hole in the centre (it was that or a bird) as I thought that was kind of what the technique was about but my bauble went all curly when I added the crackle paint - don't really like this one that much which is a shame as it is the final tag. I did however find the mica that I couldn't find for an earlier technique (it was somewhere safe) but can anyone tell me how the h*** do you split that stuff up? I just end up with flakes.


Well that was great fun but phew, all that improvisation has done my head in and I've still got more cards to make..... now, where did I put those peel offs?

Sunday 12 December 2010

More tags - but not finished yet!!!

A few more tags......

Tag 5 - enamelled metals

First of all, I really didn't get the brushing the sides of the tag, didn't seem to work for me at all!! I had no metal numbers so just triple embossed some chipoard ones which gives a similar effect. What I really liked about this tag was the idea of using distress embossing powder on metal to make the flowers. I only have one colour of dep - Tea dye - not very flowery!!So I decided to use alcohol inks - worked really well and I now know what to do with the rest of the packet of metal shapes!! I decided not to put white bits over my Santa but did highlight him with a gel pen - he looks much better!!


Tag 6 - Texture Fades


Improvisation time again - no suitable embossing folders!! I had read however that you can emboss with almost anything if you have a tan embossing mat so I cut out my own tree design and tried running it through the cuttlebug with my tag. Have to say it could have done with a bit of fine tuning but it does work and is something to remember if you want to create some custom embossing. Not entirely happy with the colouring on this one (couldn't get the colours right) but another technique experimented with.


Tag 7 - Poinsetta


Wow, wow, wow .... sorry, shouldn't say it I know but I really love my take on Tim's tag. I don't have the canvas he uses but I do have a brand new 'Marianne' poinsetta die (I'm getting a bit hooked on these actually) which I think makes a lovely flower. It has a subtle vein emboss through it as well. I dutifully distressed, glimmered, inked and rock candied and I'm really happy with the result. Oh and the background - again, no appropriate folder but I used the glue and acrylic technique with some new 'green' paints I have to give me a wood effect background. Definitely my favourite so far.

Tag 8 - Extreme Masking
lol you are not kidding!! I found an old stencil of two candles but it was very thick plastic so I made my own mask and stencil so that I could do the technique. Looks quite cool but the two inks I used were fairly similar so I used my white gel pen again just to highlight the slight 'frame' that was between the wo pieces of inking. I have to say this tag looked much better when I glittered the snowflakes - it really brought it to life, and what's Christmas without a little bling?

Off to Mr H's blog to check out the final tag and make a start on the last 4. Hope you have enjoyed taking a peek at what I've done so far!!

Tuesday 7 December 2010

And the winner is....

No 4, Netty!! Well I have your address so no problem there. Should be on its way tomorrow. Enjoy!!

Tag 4..... and we have mail...

Here is my interpretation of Tag 4 of the 12 tags of Christmas. The main techniques in use were using 'faucets'.

One of the uses Tim suggested was to put an image behind and bling it up with a bit of stickles - works really well!! But what kind of faucet is that I hear you ask? Well it isn't, because I don't have any, but that's why I was playing with the melt pot. I thought that I could make my own embellishments using UTEE and cookie cutters. I have used images behind UTEE before, and this time used a vintage santa, but I love the extra sparkle you get by using stickles.
Another technique used by Tim was to colour the gem with alcohol inks behind and then stamp an image with archival ink which then lifts the colour off - kind of reverse resist. Doesn't work so well with a UTEE shape, (not a complete disaster but not as effective as I had hoped with the stamp I used) but then the colour is not so clear to start with as UTEE looks more like amber than clear glass and gets darker the more it is heated.

I did however use the technique for the glass in this slide mailer. You may just about be able to see the little clear snowflakes.
I used this lovely little vintage image several times on this piece and on the accompanying ATC (I'm hooked on that snow effect now as you can see).

As she is wearing a holly wreath I added the poem 'under the holly bough' to the inside. The mailer is for a Christmas present swap, and I am also entering it for Alter It Monthly.
Really getting a creative buzz from doing these tags, shame I'm only on holiday for one more day, I seem to be getting so much done. Quick reminder - last chance to enter the December giveaway which closes at 9 pm tonight!!

Sunday 5 December 2010

12 Tags of Christmas begins.....

Of course I am talking about the wonderful Tim Holtz and his wonderful 12 tags of Christmas. Each day he posts a different christmas tag for your delight and inspiration. Obviously he is showcasing his products but there are still plenty of ideas and techniques that you can adapt and play around with. As I said I have wanted to do this before but never had time.... but this year it is going to happen!!


I am already behind (of course) but have finished days 1-3 and started on days 4 and 5 so not bad going for me!!


Day 1 - well, I read through the instructions and my heart sank a bit, grumpily thinking I don't have this stuff.... then after a stern talking to I started to have ideas. I may not have the folder or die to make the house, but I do have grungepaper, an embossing tool and a craft knife - might take a bit longer but not much!! I didn't have a spare holly wreath knocking about either so I stamped some leafy branches and used the leaves to make a wreath. I found one little ticket that someone had given to me, wrote the '25' and coloured it in and stamped Happy Christmas over the top. Could have made a picket fence too but decided I liked it as it was. Job done.


Day 2 - OK, this tag is mainly stamping but without having the same stamps that Tim uses it is hard to get the same 'look'. The main technique that Tim shows here is how to create a custom ink pad, but as I don't have any of the re-inkers in the right colours to do this for my stamps I just went for stamping and colouring in. Not entirely happy with this one and the colours looked a right mish mash until I added the yellow and bronze ribbons which seemed to tie everything together.


Day 3 - Yay, something I have the bits for!! Well not entirely, I didn't have any of the tissue tape, so I stamped music and text onto ordinary tissue paper and stuck it onto my bird shape and used the rest to make my 'flower'. I especially loved the 'snowy' effect Tim created with a splatter stamp and acryllic paint. I don't have that exact stamp but used a different one. I re-sized and printed out a little vintage postcard image for one of the embellishments and used some green lace with a touch of red ribbon behind across the bottom. I think this is my favourite one so far, although looking at it now I think maybe the elements are a bit too regimented but too late now!! In fact I liked it so much that I used my experimental bits to make an atc.


Well, off to dust off the melt pot and have a play and then I must sit down and write out Christmas cards at some point today...

Thursday 2 December 2010

Happy Birthday to me, Week 2 part 2, and Week 3 part 1!!!

First of all thanks to everyone who sent me cards for my birthday - I have a stunning display up and will pop round to say thank you properly as soon as I can. Am having a quiet day, partly in my craftroom and partly with my DD who has decided to keep me company. This evening I am out with my darling hubby for a quick meal and then to see Bill Bailey at the theatre. Brill!!


OK, now we are back to the Art and Healing course which I am now about 3/4 of the way through. The second part of week 2 was to do a page in our altered books representing a positive outcome from our younger years (or sort of turn something around so it is positive even if it wasn't at the time). I chose to focus on my school days and the positive influence of a lovely lady teacher, Miss Gillian Smith, who was a great encouragement to me - I was a shy little soul back then.


So this is a picture of her and me (looking a bit like I'm about to ascend to the heavens) with a picture of my old school in the background. The words I have chosen to accompany the page are 'Shine your light'. Miss Smith once said to me that I 'shouldn't hide my light under a bushel'. My biblical education being somewhat sketchy at the time, I had no idea what she was talking about, but as the years passed I realised what she meant and I have never forgotten her support and kindness.

The next things was to do our front cover with some photograph altering (loved that!!) and a little tag to go on the front. I couldn't think of a quote to put on the tag but finally I chose one from Dr Seuss: - 'Today you are you, that is truer than true, there is no one alive who is youer than you'.


Because I have access to them at work, the book I am using is a recycled board book. The down side of that is that the baby books have seen a lot of love during their shelf life (and drool, chewing and generally been treated with the care and attention you expect from the average toddler). When preparing the back of the book I realised it wasn't going to withstand a lot of prep, so I have made a little pocket out of the last page - not sure what will go in there yet. I still have to make an empathy puppet (might pass on that - there are some great ones about though!!) an affirmation page and something with my personal 'angel'. Because I have so many other things to do at the moment I am going to leave these until the christmas break rather than rush. I also seem to have lost the sound on the computer which makes it a little difficult to follow the videos...


I must also quickly blog a little altered matchbox I have made for a swap on Flickr. It has a little domino book inside and I chose an oriental theme just to not be doing Christmas for half an hour. I have to do displays and activities at two libraries through Nov/Dec as well as my own stuff and sometimes I just need a break...... but I'm still smiling through apermanent sprinkjling of glitter.


Having said that, I'm thinking about doing the twelve tags this year even though I'm already a day behind..... well, if I get at least one done today I might go for it.

Monday 29 November 2010

A grungy Christmas giveaway - and an apology...

Well, I know you guys won't mind if I tell you that regretfully I have decided to combine the November and December giveaways - my art time is really under pressure at the moment and it will give me a little time to catch up.

I really did start this on time for November, but I have been fiddling with it for ages whenever I can get a minute in the art room. However I have decided it is finished and I had better upload it NOW so that it can get to someone in time for Christmas!!


Well this giveaway is a mixed media canvas. I have been doing the wonderful Art and Healing Course (more posts on that to follow when I get a minute - I haven't been completely idle!!) and did this little Christmas figure as a practice piece and liked her so much I thought I would create a background for her. There are a lot of layers (so loads of drying time!) and it ended up even grungier than usual because for one I made a glaze with black acryclic rather than dark blue - I wouldn't mind but I did the same thing the other week and re-sorted my paints to stop it happenning!! The trials of art in artificial light. Still think I managed to save it. Collage, image transfer and stamping onto tissue have all been used here (I find stamping onto a canvas is horrrendously unpredictable, using tissue paper helps that out a lot and if it disintegrates you get some added texture!)

I love the sentiment I have used, I think with all the hustle bustle that surrounds the festive season we forget to enjoy ourselves and celebrate the season on a day to day basis. Despite being really busy, I'm trying my best to keep a smile on my face and not get stressed - doing OK so far lol!!

Right, how to enter - it's simple!! Just leave a comment on this post and you will be entered in to the draw. As this is a Christmas item and we are already a long time between giveaways I think this one will have to have a very short tunaround. So the closing date will be 9.00 pm on Tuesday 9th December. Yep, that's right, just a week, but it's because I know I will have time to get to the PO on the Wednesday morning - so if you are entering and I don't already know you, don't forget to check back in case I need your addy!!

Inernational players welcome but receipt before Christmas can not be guaranteed (sorry!) as last postal dates are probably Monday. Feel free to link from your own blogs and Happy Christmas Season everyone!!

Monday 15 November 2010

Still plodding on....

Thought I'd maker a quick post of a couple of things I've done recently just to prove I am still here. As I feared, working 4 days a week instead of two has dramatically cut down my art time so I'm just getting to it as and when. Still, I have a clear day in my art room today - a special treat as I have been so busy!

Here's is a little Autumn Fairy Art Doll I made for a swap on fantastic Paper dolls.


And here are some cards I've made for recent swaps and birthdays.


Right. Off to get inky!!

Monday 1 November 2010

Self Healing Art Course, Week 2 - Part 1!!


There is a lot to get done this week on the art, heart and healing course. We are altering a board book and the first exercise is a page dedicated to our younger selves and the wishes we might have had for ourselves at that age. The main technique that we are trying out is image transfer, a great favourite of mine.


I only have this one (easily available!!) image of myself as a young child which I have successfully used before in my artwork as a transfer so although it took me quite a while to find what I had done with the original (stuffed in a folder - it has now been properly scanned in to my digital files) I thought that this would be quite easy. Wrong!! We were using the acrylic gel medium method but I couldn't find my golden medium (sure I've got some somewhere) so went out to get more but could only find a structure gel by Galeria. By now I was champing at the bit to get going so decided it would have to do. I wasn't entirely unhappy with the transfer but the resulting image isn't very clear. Good job we were going for a vintage grunge look! The first transfer went on a bit wonky and looked rather small so I decided to repeat the image and added the words 'Where will you journey litttle one?' - I was thinking along the lines of there are different paths you can go on throughout your life and right at the beginning the choices open to you are endless. Yes, it's official, doing this course is making me a bit deep.


The second part of this exercise was to write out those wishes I mentioned above and add them to the page. The ones I chose for my young self, or any young person for that matter, are:

Home and Family
Friendship, Love and Passion
Confidence and Ambition
Strength of Body and Spirit
Creativity and fulfilment
Self Reliance and Compassion
Happy Memories and Hopeful Plans
May you never be alone, and may you always want what you have.


For me this has been a very positive and self-affirming exercise, even though the I'm not sure I am entirely happy with the artwork. Why? Well, although I don't think I had a perfect childhood, by trying to pin down my negative feelings I realised that the bad bits don't really have any effect on me anymore. What has been is past, what is, is and what will happen, will. I find that the circumstances of my early years that did hurt and anger me to think about 10 years ago or so have lost their potency. But I can recognise that they made me who I am, and even with all my faults and foibles, at the end of the day I quite like being me. So perhaps they weren't that bad after all.

Ha ha ha. Told you I was getting all deep and introspective. Right, on with part 2.

Sunday 31 October 2010

The giveaway winner for October is....

SHERRY. As requested the green one will be wending its way to you this week. Hope you like!! Thanks everyone for playing, it was a bumper number of entries this month. The next giveaway will be along shortly so don't forget to pop back!!

Sunday 24 October 2010

Self Healing Art Course..... Week 1

As I mentioned before, I have joined an online art course which started this week. Well, guess what, had no time or energy AT ALL to do art this week so I am already playing catch up, not that it really matters. It is called Art, Heart and Healing and is free to join. I managed to watch the first of this week's two videos on Monday, so had a week to think about the hard part, which is the therapy exercise related to the course. This morning (Sunday, it may be Monday by the time I post this) I re-watched the first video and sat down to put pencil to paper and ..... nothing. I found the exercise of putting down your negative thoughts (pop over and watch the video if you want to understand) soooo difficult, probably because most of them are not art related but about the way I am and the aspects of my behaviour that I am not happy with. Trying to give that a positive spin sure gave me a headache!! But it is interesting to do the exercise. So what I came up with as a message was this.....


for me it works and reminds me I am only responsible for me, not everybody else. We also had to choose a word - I chose balance, because balance is what makes me happy, when all the different aspects of my life have a chance and nothing or no one is being crowded out by something else.


With regard to the portrait/journal page that we were doing as a first project, I followed Tam's instructions really closely as I wanted to focus on the techniques she used and see if they worked for me. Like many others on the course I am making do with the supplies I have so I used a sheet of A3 water colour paper, some (fairly cheap!!) soluble crayons, pencils and acrylic paint. I really liked working with the watercolour paper and the crayons are great - I've had them anbout a year but only used them to make some backgrounds a few weeks ago - I could get hooked. The figure is supposed to represent yourself and I did stick quite rigidly to that - lol, what am I saying, I wish I did look that good, with no crows feet and glasses. The point is, what I had in my head was the image I kind of hold of myself, not what I see in the mirror(self delusional or what - don't panic, that was a joke, not a negative comment). Doesn't she look calm?

I have painted a couple of small faces before, but I have never ever painted on this scale and found Tam's instructions so amazingly easy to follow. I think because I was thinking of it as 'me' it ended up more stylised and representational than a whimsical interpretation but hey, it's all a learning curve and overall I am really pleased with the finished result, except perhaps that I would have preferred not to have the portrait so far over to the right. The background I am not entirely happy with so I may work a bit more on that. Ha ha, what am I like, I chose the right words lol. I love layers, I've just never done them this way before. Agonising over my internal battles and choosing words aside, this took less time than I have been known to spend on an ATC so maybe I am more comfortable working bigger. After the initial terror of a piece of A3 sized paper I was fine, but then I was copying a formula which is always easier than coming up with something yourself. Certainly something to think about though.

Sunday 17 October 2010

Am I mad? (Don't answer that question.....)

I have just agreed to take on additional hours at the library and from next week will be working an extra two days so almost a full week, especially given the length of some of my days!! I have really been feeling unfocussed lately and although I enjoyed the extra free time in the summer I am now starting to miss life being as hectic as when I was gardening and designing. I'm hoping that putting myself under pressure will have a good effect on my art......


Here's a little altered Cd I knocked up for the UK Art Raffle. You may recall I recently lamented its closure, but 'princess kitten' has stepped up and offered to run the raffle. So it has a new home here and is in desperate need of more supporters!!! The October theme is 'hubble bubble toil and trouble'. So I did a pumpkin (of course). Well there's a witch on the back. Sorry don't really get this obsession with Halloween every year.

However, if we don't get a few more participants I can't see it carrying on so if you've got a spare halloween themed card or ATC why not join in?


Oh well, off to tidy up my art room now as I am starting a new on-line workshop 'the heart of art' which I am really excited about. The course is about self healing through art and will include a variety of things such as backgrounds, whimsical characters, a puppet(!!) altering a board book and generally having some fun. It has been developed by TAM of 'Willowing and Artist Friends'. This particular course is being run for free, but Tam does other courses (available on CD!!), and U tube demos. I love her work and from what I know of her Tam is a wonderful generous spirit. But then, don't you find most arty people are??

Monday 4 October 2010

Just wanted to get this one in.....

for Tuesday Taggers, just to show my face so to speak. The weeks go soooo fast. There'll be another challenge tomorrow!! Anyhow must just mention that this week is sponsored by the Craft Barn - so it really is worth your while entering some of these challenges.


The TT theme was 'Here comes Autumn' and my entry this week is an ATC, and the reason for that is because the original idea came from a challenge on the Flickr ATC trading group 'Artful Ideas'. The challenge was 'Autumn Romance' and immediately this image popped in my head but I dismissed it at first (mainly because I wasn't in the mood for getting paints out - it can get messy!!). But yesterday I decided it was appropriate so I went ahead and did it. I already had the background made in yummy reds and golds so I simply painted on top - thankfully nothing ran, as I couldn't really remember what the background was made from. My painting skills need a little refinement but both my son and OH when asked said it was a picture of a couple kissing under an umbrella so I guess it can't be that bad. Why an umbrella? Well, it hasn't stopped raining here for days....

Sunday 3 October 2010

October giveaway is here - nice and early!!

Had a good couple of days craft wise this week, still inspired by my visit to Ally Pally last weekend. When I am there I usually make a bee line for the LB Crafts stall, because as well as all the yummy goodies there are usually loads of demos going on. Had a bit of a discussion about my distress technique, and was inspired by some monochrome hanging samples (well all the samples were pretty inspiring!!). Is monochrome the right word to use for single colour or is that just black and white???


Anyhow, armed with my little chipboardy type books I decided to make some hangers and test out the instructions I had been given. I decided to do three at once using a selection of distress inks - Victorian Velvet, Dusty Concord, and Bundled Sage. The only problem with doing them all at once is I made the same mistake on all of them - waded in with my cropodile to add some extra holes and made all of them too far in from the edge to be accommodated by my split rings. Ooops! But not irretrievable in the end.


I decorated them with some bits of grungeboard swirls (and the waste lol!!), some grunge paper flowers, stamping, embossing and various bits of old bling that I found in my stash, plus of course the odd bit of inspirational text. The chain also adds a certain something so I'm glad I made the effort to use it (trust me, with my eyesight it is a challenge undoing and re-sealing all those little links).


Now for the rules of the giveaway, which is for one of these little hangers. All you need to be entered is to leave a comment on this post specifying which is your favourite (we'd better call them green, pink and purple) before 8.00 pm on Saturday 30th October. The 'winner' will then receive the hanger of their choice. So that's all, international players welcome, and please feel free to link from your own blogs. Thanks so much for stopping by!!

Saturday 2 October 2010

Well, you all had a 20% chance of winning.......

because there were only five entries!! Hope that this was due to my very late post rather than nobody liked the giveaway! Anyhow, the random number generator thingy came out as No 1, which was Netty, so I shall be sending this off early next week.

I am much more organised for October, and will upload the giveaway tomorrow, just waiting for a ickle bit of distress stickle to dry.... Think you might like this one, all I'm going to say is think grungeboard and distress inks........

Friday 24 September 2010

Couple of quickies....

First my entry to the Flickr ATC trade group 'Altered Ideas'. The current challenge is to use a colour swatch - rather more difficult than I had anticipated!! Still, here's my offering:


and secondly, my final contribution to the UK Art Raffle as sadly this challenge blog is closing due to lack of support. For this I made a slide mailer with a slightly oriental feel. This again was a colour challenge, red and orange. Such a shame.


Tuesday 21 September 2010

Bad Blogger!!!!! September Giveaway

I realise I am in danger of becoming a bit repetitive but crikey, where did this month go? We are nearly at pay day and I still haven't uploaded this month's giveaway - this always happens when I am trying to be organised and get it done in advance!!!


This was a relatively easy make, inspired partly by something I'd seen in craft stamper (and no, I am not going to go back through the issues to tell which one or this will never get done) and a lovely set of glamour girl stamps I recently liberated from my friend Viv. Basically just inked background and some stamping. Do you remember the packaging I used last month to make a sundial tryptich? Well, the glass clip frame is what was in the packaging. I thought I would finish it off with a little stamping and embossing on the glass which so far seems to be holding up.

Anyhoo, the usual rules apply. Should you wish to be included in the draw then leave a comment on this post before 8.00 pm on Thursday the 30th September. Overseas players welcome, and please feel free to link from your own blogs.

Thursday 9 September 2010

I don't know if I told you....

but I am crazy mad making cards to sell at My MacMillan Coffee morning in a couple of weeks. However, yesterday evening when I got in from work I had an overwhelming urge to take a break and make some art (no disrespect to card makers everywhere intended!). I really wanted to make sure I had an early entry for my altered art challenge group on flickr, 'Art n Soul' because I have missed so many lately. The September challenge is to alter a beer mat or coaster to the theme of nature. Initially I was going to do just a single mat for speed, but after looking at the Tuesday Taggers theme of 'Books' I decided I would make a little book and satisfy the requirement of both challenges.


I took three mats and covered them with old book pages and then had a lovely fun day splodging and inking and stamping - sometimes I think the end result is more gunge than grunge but I usually have a good time and I find a bit of gold paint here and there tends to lift the whole thing!!


As a title I took half a quote stamp 'Honour the Seasons of Nature' and then made four inside pages using a set of seasonal tree stamps by Whispers/docrafts that I have had forever - I think they were one of the first sets I bought, well before my current affliction took hold.


I particularly liked the way the autumn page turned out.
For the back page I kept it quite simple and after abandoning my split rings as fasteners because they were just too big I just knotted some cord to hold the whole thing together.
It's rare that I get a project finished in one sitting so to speak (well I did start last nighht so a bit more than one session) but for once I really knew what I wanted to do and not too many things went wrong. Just you don't love it when a plan comes together? Ah well, that's my fix over, back to the cards lol.

What's On Your Workdesk Wednesday? #771

  Morning deskers, welcome to our weekly Wednesday Blog Hop - WOYWW. Here's the link to the one responsible, the lovely   Julia at Stamp...