 Well I'm not usually a tutorial person but as several people suggested it here is an explanation of my thought processes. What I will say is there is certainly more than one way to do each of these steps and my method may at times seem to have too many steps. But rather than twist myself in knots trying to think of the best way to explain what I did I am just showing it as I did it. Hope that makes sense!! I warn you that the photos are likely to be awful.
  First of all my inspiration was from this bag which I found here when looking for templates. I printed out the template out on A4, but of course it was way too small for what I needed. Not having access to enlarging facilities I decided I would just use it as a guide.
For this project I used a light to medium weight craft card (probably about 160/180 gsm). A heavier card might not sit so well for the sides. I used 5 sheets of A4 card to make the basic shape. (Although by adjusting the size of the top/flap piece you could probably get it down to 4). I cut each piece (front/back/sides x 2/top) as a separate item and added tabs where necessary to join them together. Be warned, I don't like measuring!!
 - Front and Back
My bag had to fit some gift boxes and I needed a base of approximately 18 x 12 cms to accommmodate them.
Take two pieces of A4 card and cut the long side down to 29cms.
Take one of these and score at 12 cms on the long side.
Score the second piece at 1cm and 12 cm on the long side. Cut off the 1cm.
 This gave me the front and back and base section.
 By overlapping the smaller section of each card and gluing them together I reinforced the bottom.
Having one of the 'bottom' pieces slightly smaller than the other meant the join was underneath rather than exactly on the edge.
- Sides
 The two sides seemed fairly complex in the original template. However after trying to work out the relational measurements (and failing) I did the following.
Cut two pieces of card, 18cm x 20cm.
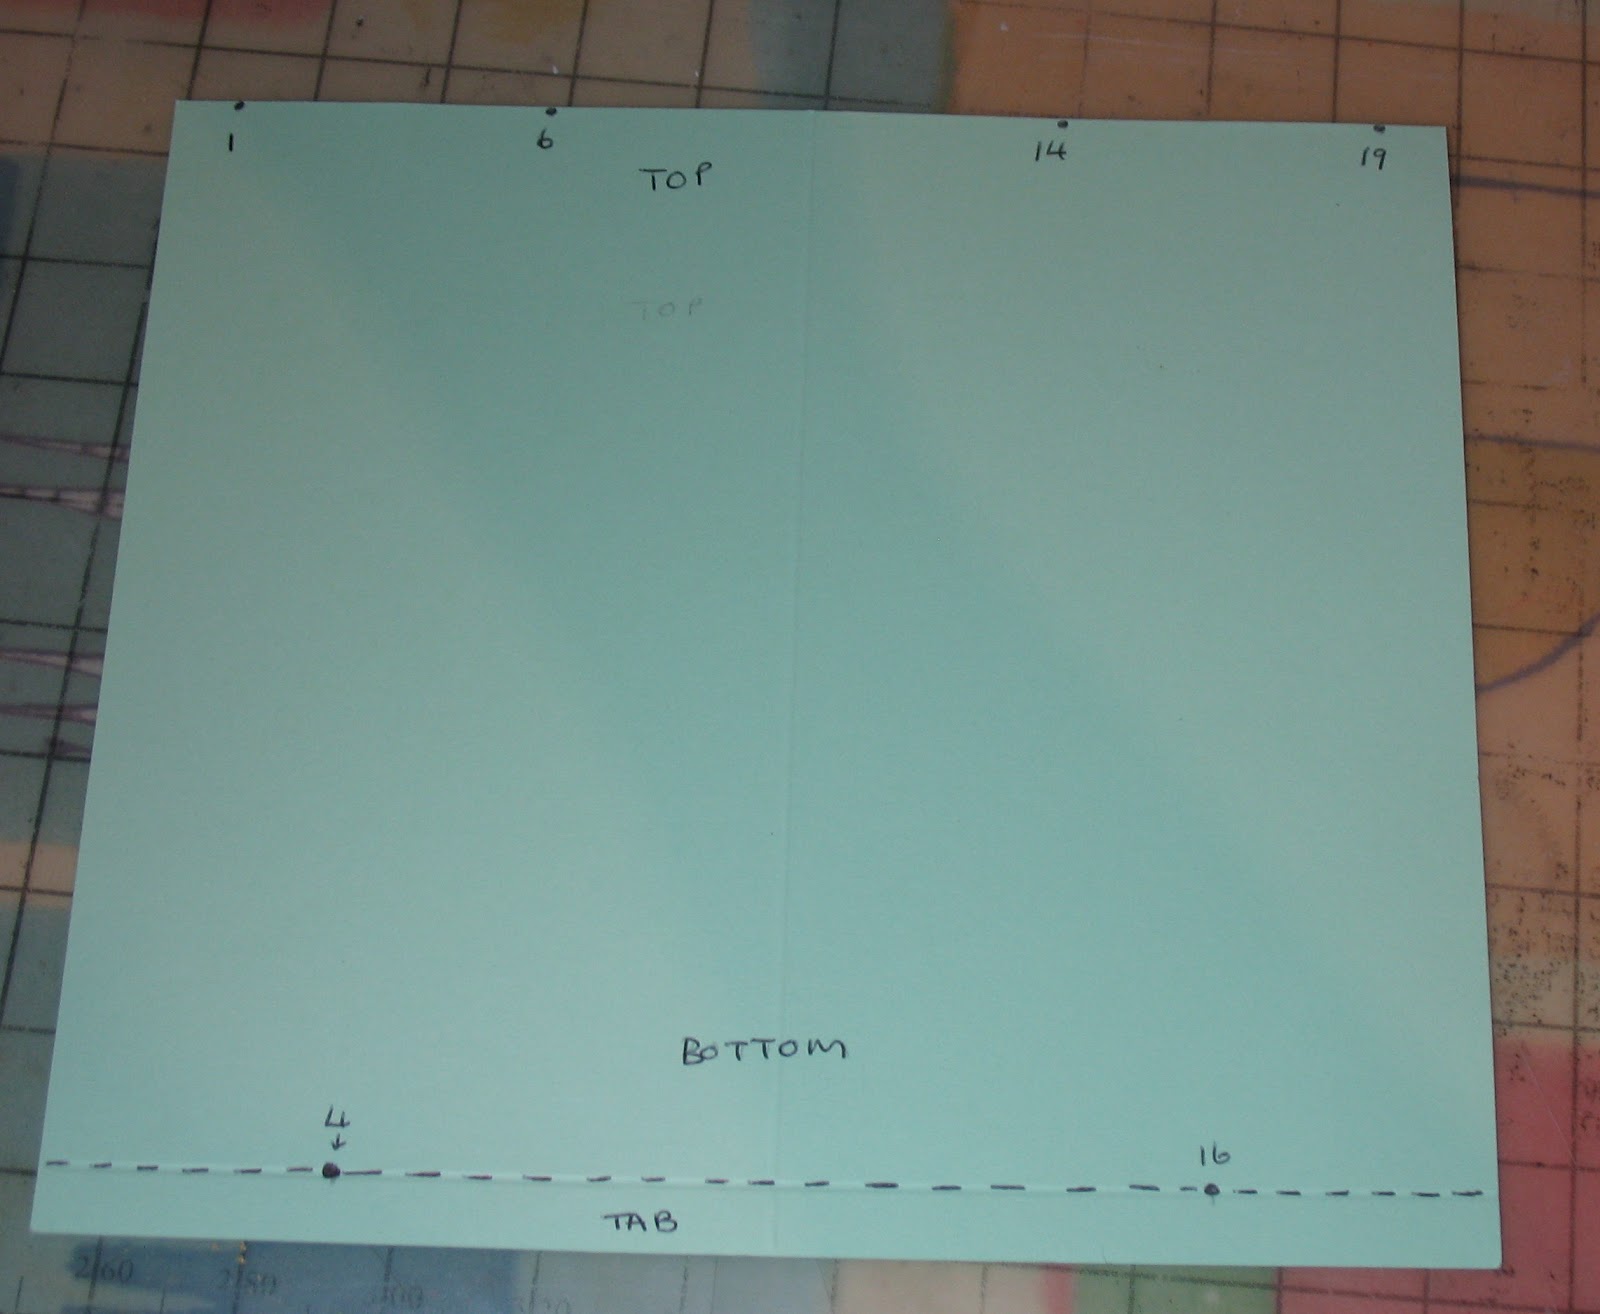
On each piece do the following-
Score and fold at centre (10 cm) on the long side
On the 'top' make a guide mark at 1, 6, 14 and 19 cms
 Score along the bottom edge at 1cm. This will create your 'tab' to fix the sides to the base.
On this 1 cm line, make a guide mark at 4 and 16 cms
Create score lines from the marks at 1 and 6 along the top to 4 on the 1cm line and from 14 and 19 along the top to 16 on the 1 cm line.
On the outside edges create a tab so you can join all the sides together - oh, just look at the picture!!
- Ribbon Slots
 After playing around with different measurements I decided that the sides of the bag would have probably worked without all this complex fold calculating just by doing a stright rectangle with a fold!! But I liked the ribbon slots and the way the bag in the original design opens wider at the top so thought I would try and replicate that as far as possible. However the hardest part was deciding where to cut the slots. Eventually I opted for placing them all 2cms down from the top edge at roughly equal/central intervals. The size of your actual slot will depend on the ribbon you intend to use. Cut them with a craft knife.
(This is not exactly a perfect instruction and they will NOT line up exactly when the whole thing is put together but it seemed to work well enough for me. After all, it's just a gift bag!!).
You will also need slots on the back piece, the front piece and your flap (see below) if you want to tie your gift box like mine,
- Top and Flap
The original sample I looked at appeared to have the flap just tucking behind a paper ribbon - I wanted the purse to be able to be held by the handle and couldn't see how this would work (surely the bag would pull open?) so my design also has ribbon holes on the flap to thread the ribbon through and tie at the front thus holding the whole thing together. Alternatively velcro or another type of fastening might work.
 You can make this as big as you like, depending on how fancy you want to make the front and back of your purse. Basically you need to make a 'U' shaped piece of card with two folds and three sections. One 'section' will attach to the back, the central piece will be the top where the handle is fixed (make that about 3cms deep) and the third side will be your front flap. If you are threading all the way round like I did you will need two ribbon slots on the back and front at the same height as the ones on the side. You may want to leave the final positioning of the slots on the front flap until you have put the bag together to make sure you line them up properly for a neat finish.
- Decorating and construction
 I covered the front, back and top in decorative paper which strengthened it all. I suggest you do this before you put the whole thing together. I left the sides white which fitted with my colour scheme. Alternatively I would suggest making the sides with your patterned paper (if not too thin) as a double layer might make the folds in the sides troublesome. (Note: after you have attached them you may have to just trim the top corners of the sides ever so slightly).
  I made a handle with a strip of paper and card and added it but you could use ribbon, wire and beads - whatever you wish. Once I was happy with the decoration I put the whole thing together.
 Finally I embellished the bag with diecuts, flowers and a matching tag and added a length of co-ordinating ribbon. Closing Tip: When my bag was all put together I found I had a bit of 'play' in the closure because my ribbon was quite a bit narrower than the slots I had cut - so choose your ribbon first and size your ribbon slots accordingly.
 I can't help feeling this was all a bit longwinded but it may be helpful if you want to make a larger bag without using enormous pieces of card. It really is easier than it sounds. The finished project is approx 17 cms high, 12 cms deep and 21 cms wide (ie the width of a standard piece of A4). Enjoy!


9 comments:
A really beautiful project Cindy and fabulous tutorial, I love how detailed it is.
Great tutorial Cindy, its a gorgeous bag.
Yvonne x
That's fabulous, Cindy. for a non-tutorial person, that was a very good tutorial! You should do more. Actually I find it helpful to blog step by step projects because I can always go back and remember what I did!
Thanks for your lovely comment on my blog. The show is over, and I shall be blogging about it in due course when a) I've unpacked my boxes b) sorted and uploaded my photos and c) got over the exhaustion of the past week or so!!! I'm knackered...
I smiled at your comment re the boxes as well - I NEVER get things right the first time - and sometimes not even the second or third time! I'm a terrible Waster of Card I'm afraid... and a hopeless measurer, and I'm not good at cutting straight, even with a ruler. I think I'm actually going to redo the box design and make it a tiny bit smaller... I'm also a perfectionist and won't give up till I'm satisfied I've got it RIGHT!!!
Beastly Blogger playing silly bloggers again... It really is a pain sometimes. It used to work so well, until about 18 months ago. Using Windows LiveWriter really helps as far as posting is concerned as it gives a lot more freedom. I know everyone's been complaining about posting since the Blogger revamp but using Live Writer, I haven't tried it so I don't know.
Shoshi
Beautiful bag Cindy and the tutorial is terrific. The colours you have chosen go so well together
Love Chrissie xx
That's a very effective project Cindy and your tutorial is excellent. I love the way the ribbon slots through at a lower level too. Some good detailed ideas there.
JoZarty x
Love your tutorial , have bookmarked it & will try it out once the "one-armed" husband is feeling a little more human ( just had rotator cuff surgery to his shoulder)
Sally
This is beautiful and so creative. Love everything about it. Great tutorial.
Hugs
Desíre
Digistamps4Joy DT Member
Doing Life
Wow!!!! how clever are you Cindy,you have done it so well congratulations, luv Georgina x
Beautiful Bag Love all the details...
Post a Comment