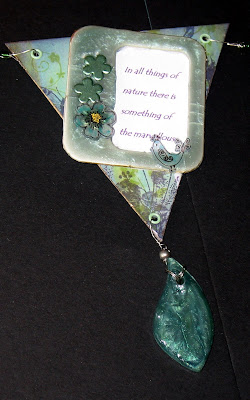
Back at the beginning of April, I asked if anyone wanted to take part in the PIF challenge. I had two takers and just thought I would share with you the items that I sent off.
First, for Belinda, I made a little pennant banner, similar to one I made as a giveaway. At the time I had been playing with some coloured UTEE and had various bits and pieces that I had coated or made with it so that kind of set the initial colour scheme, and because those things included a dragonfly and a flower, the theme as well.
I also used some shrink plastic to make the little birds and flowers, and made some jigsaw charms to dangle - do like a good dangly bit lol.
The second person to take part was Trudy, and for her I recycled (or maybe re-vamped is a better expression) an earlier piece to make a wall hanging. Anyhow this is how it turned out.
Now, the idea of the Pay It Forward challenge is this, I promised to send a little crafty surprise sometime before the end of 2009, to the first 3 people who left a comment on my blog.
BUT, to takepart ... they must continue the chain and offer to send a little something to the first 3 people who make a comment on a similar post on their own blogs..
My original post only got two participants, one of whom doesn't have a blog and who will be continuing with the challenge in a different way .... so technically two people can still take part. So, if you want to spread a little happiness around, leave a comment here to that effect and I will be in touch. Soon.
Welcome to the ramblings of a 60 something wife, mother, daughter, sister, friend and crafty individual..........
Sunday 31 May 2009
Tuesday 26 May 2009
It's Tuesday again.......
so here's another tag for the Tuesday Taggers challenge. The theme was to be bold and bright which is sometimes a bit of a challenge when I get stuck in a vintage groove. But here is my effort - it was a great excuse to use these two stamps and although I really wasn't sure where this one was going, I quite like it now it's finished. I have to say though, that week went quick...
Monday 25 May 2009
ACF - Tag
Just a quick post - busy busy busy..... decorating and gardening this weekend. Decided not to entertain but crack on with some chores round the home. It's boring but has to be done. We are moving things round YET AGAIN, so that my son can have my old studio as his bedroom - it is a bigger room and also has built in cupboards so he should end up with plenty of floor space. Well, given he spends so much time in his room we might as well make him comfortable and its a lot cheaper than converting the loft!! He's also on the ground floor and nearer the kitchen so I won't have to trail up the stairs to tell him his breakfast/lunch/dinner is ready (I have been seriously considering installing a bell). But man, I hate painting walls.
(Just read that bit again - sounds like we've got a mansion - really, it's not lol)
But I digress, firstly I just wanted to quickly post a tag I made in response to the ACF challenge. It was a beautiful vintage image with a lovely background - sometimes it seems weird to try and change what we are given!! Anyway this background is quite different to the original one, but I'm not quite sure where my head was!
Secondly, I wanted to announce the MAY GIVE AWAY winner as Lynn. Well done Lynn, I have emailed you.
Finally, any of you who ever visit the DC forum (stop hissing) just to say it is my week to host the nightly challenge, would love to see you there.
Happy Bank Holiday Monday to all the Brits!!
Wednesday 20 May 2009
Something a bit different........
There is a burgeoning Altered Art section over on the Docrafts forum, and varous challenges have been issued ... the latest from Nicks is to alter a frame. Well I have had a very simple frame for some time - in its previous life it was pink and silver and in my daighters bedroom - well we have moved on from the days of everything must be barbie pink to 'Shabby Chic' (clpothes are still all over the fllor though, but I digress...) and I've been hanging on to this thinking I might just do something with it. Last year I saw a project like this in Craft Stamper magazine and so Nicks' challenge spurred me on to dig out the article, check my stampboard stocks and have a go. This is what I've done..
The reason I didn't do this last year was the article actually stated they used 1.5" x 1.5" stampboard for the project - a size which does not appear to be actually manufactured. It would have fit perfectly on my frame at that size, but obviously that was not to be so the whole thing got put on the back burner. Having decided to go ahead, I needed to take stock of what sizes stampboard I had and design a sort of balanced random layout!! In the end I used 2 x 2s, 2 x 1s and stuck in a couple of other playing tiles I had for good measure cos I ran out of other stuff!! It's basically coloured up with dye inks, then stamped, sometim4es in layers. I started off using stazon for the 'black' bits but kept smudging, so went on to an archival ink which seemed to work better. To finish off, before I added the embellishments to the tiles I followed the suggestion in the article to coat it with beeswax. I have n ever done this before, I am not exactly sur how you are supposed to 'rub' hardwax on to a surface (in the end I used the heat gun!! and after I buffed it up I wasn't entirely sure I hadn't just rubbed it off again. However, it looks OK, I think it works, it's certainly the kind of thing that would catch my eye if I was looking for something. I am wondering whether to add some metal, or perhaps have some dangly charms to the bottom right.... will let that idea ferment for a while and see what I come up with lol.
Had some good news yesterday as a friend of mine had her first baby - yay, way to go Michelle!! At the time I got the text I was looking at a new challenge site called 'Tuesday Taggers'. As Tuesday is a day I am often around, and I'm starting to get in to tags, I thought it might be worth giving them some support - as the theme was 'New Beginning' it seemed appropriate to make a new baby tag. Until I realised I don't really have any baby stuff...... well, it's not too bad, but maybe I should look out for the odd teddy bear stamp or something, you never know when they'll come in useful lol.
Don't forget to enter the May giveaway if you haven't already done so - details on the side bar - just a few days left!!
Sunday 17 May 2009
Angels and Gypsies
Just a couple of quick posts. First the second ATC for MAMMA challenge - good job we had two weeks lol!
I'm also ahead with the ACF challemge this week - I'm usually still trying to get it done on Thursday!! The challenge this week was to use a background. It was hard to cover it up, but I'm in a bit of an angel mode at the moment so here's what I did.
In fact, I wanted to do a new angel piece to put in to the Altered Monthly challenge on Flickr, and together with the 4 x 4 I did last week for Astrid it got me thinking...... so I have decided to concentrate on making some 4 x 4 pages to make a little 'Angel' book similar to last month's give away to keep for myself. This is the second page I have done,...
Finally, here's a little tag book I made for friend's birthday with some stamps I bought at Ally Pally last month..
Wednesday 13 May 2009
Challenges - for once
Actually had time to make things for two challenges this week. Firstly for Art Creations Friday, I made an ATC using this image of a lady holding roses. The background card for this ATC was made using watercolour and rock salt. The technique I read said water colour inks, but I don't have any of those so just thoroughly spritzed the paper and smeared with liquid/paste water colour and then added the salt. Easy peasy, and seemed to work OK - I did a few sheets whilst I had the condiments out.
Secondly got 1 entry in to MAMMA Challenge. Think there will be two as I have started another one. The them was a gothic arch ATC with the theme of 'Gypsy'. Well while I was looking around for some images as I could only find a couple in my stash I saw some photos of 'traditional' gypsy caravans (have a google, they are stunning) which gave me the idea of creating a bow top style caravan. Well I think it worked, I made it so that part of the door opened and I used one of my existing images to put a gypsy inside.
I also used some of my salted background paper to create a 4x4 for a trade with Astrid. The image was from a challenge from ACF a couple of weeks ago which unfortunately I never got around to using. She is really pretty. In fact I liked her so much I immediately made another one with the same image!! But like the 2nd gypsy ATC that one s still drying (see I am getting patient in my old age) and will have to be the subject of another post.
Monday 11 May 2009
MAY GIVE - AWAY!! Enter here....
A day later than advertised as our main pc crashed yesterday - shouldn't really affect me as I have my own, but it's the master one which drives the network and most importantly the link with the printer which is how I get photos from my camera these days.... confused? well never mind it's pretty much sorted now, OH spent most of his Sunday rebuilding the d***** thing again .... he's getting quite good at it now.
So here we are...
I'm sure it is not obvious what this little objet d'art is so I'll explain. It's a little trinket box made from dominoes, covered with paper, painted, stamped and embossed. I do like to ring the changes lol. And because it didn't look that inspiring I made a teeny weeny concertina book to go inside as a little extra. I didn't say these giveaways would be anything useful!!
OK, you surely know the form by now, if you want to be included in the draw leave a comment on this post before 8.00 pm on Sunday 24th May. Please feel free to link to this giveaway on your own blogs and thanks again for visiting, ALL your comments are much appreciated even if I don't always get time to reciprocate.
Hugs Cindyxx
Tuesday 5 May 2009
Double stamping challenge..
Over at the SIS Club on Flickr, the very talented Agnes the Red sets up a bimonthly project and challenge with great tutorials. I don't always get time to take part but the current one is creating collage backgrounds by double stamping so I thought I would have a go.
I picked two stamps that looked similar to the ones that Ange had used in her tutorial and some others that also looked like they would give a good contrast. Because I was concentrating on understanding how the two stamps should work together I used a plain background and/or two colour inks to start. The trick (I think!!) is to have one stamp that is quite fine and one that has large areas of positive and negative. I used rubber stamps, but I can see how clear acrylics might have an advantage. A good juicy ink is also probably a good idea - although the one I did with a lilac versacolour ink actually showed through the Archival ink I stamped over it - not the idea at all but I thought it looked OK. Craft is full of happy accidents. Anyhow the most successful was probably the lady and the text stamps so I got carried away with this combo - the whole lot are on my Flickr gallery. The second part of the project is to create something using this technique - these are what I made with the two pieces of stamping shown above. The second part of the tag is also double stamped.
This final piece is using a very detailed piece of backing paper - I decided to pop it into a little memory glass frame (bought these ages ago - a must have - and have never used them). I might even stamp and emboss onto the glass to add some more depth but for now I quite like it like this.
I've gone on a bit (trust me Ange's tutorial is much easier to understand!!) but am really pleased I tried this out. I love stamping, and have a lot of stamps, but am very bad at using them in creative ways so this has been a great exercise for me - and you know what a technique freak I am anyway!!
Next post will be for the MAY GIVE AWAY.....
Subscribe to:
Posts (Atom)
What's On Your Workdesk? Wednesday # 798
Morning deskers, welcome to our weekly Wednesday Blog Hop WOYWW which is now being hosted at Sarah Brennan's blog. Here's the lin...
-
Well hello there!! Whether you have arrived here as a regular reader or via a link from the wonderful One World One Heart Blog you are ve...
-
Helloo bloggers!! You all know how ditzy I am, and I ALMOST forgot about the fantastic 'One World One Heart' event taking place betw...
-
Morning deskers, welcome to our weekly Wednesday Blog Hop - WOYWW. Here's the link to the one responsible, the lovely Julia at Stamp...